Your intrepid intern decided last night to put her money where her mouth is (about $28 in fact; even cheap Irish Cream is still kind of pricey if you're a broke college student) and make the Irish Cream Cheese Cake recipe below. After writing about it, thinking about it, and salivating all over my desk, it had to be made. I neeeeddeed it. Overall, the recipe was a smashing success, but as with anything that is good and truly worth indulging in, it was a little bit of an adventure:
First piece of advice: If you decide to make cheesecake--although, I guess this could be true for any sort of complex recipe--don't wait to do it until 9:00 on Monday night. You will be tired, you will be cranky, and you will wonder why the heck the darn chocolate isn't melting faster! You will snap at your boyfriend when he isn't whipping the cream properly and by the end, you will be sweaty and wondering "What chocolaty demon possessed me to do this!"
But I digress....so instead of doing it late at night after a long day of babysitting, interning, dishes, etc., plan in advance. This new and revolutionary baking technique allows you to purchase the needed ingredients the day before, get 8 to 9 hours of sleep, and wake up refreshed and ready to bake the next day. Otherwise, you'll be standing in the booze section of Kroger at 8:30 p.m., tiredly staring at an insurmountable wall of liquor, searching desperately for Irish Cream, muttering to yourself like a crazy person, and getting weird looks from people, only to find that it's been staring you in the face the whole time. This recipe is not overly complex, but it does take some time. So, if you have to get up early the next day or it's just been a long day, pace yourself. Professional chefs use a technique called "mise-en-place", which means to have everything measured and prepared before you even start cooking. Do this the night before. Plan ahead. Besides, if you start cooking later in the evening, you won't get to eat until the next day because you have to let the cheesecake chill for at least two hours. So what's the point? Although, I do admit it was fairly tempting to grab a piece at one in the morning...
Second piece of advice: Don't skimp on the chocolate chip cookies for the crust. The more crushed up cookies the better! My sous-chef (a very patient boyfriend who was kindly following all of my orders without question) didn't crush up quite enough of the cookies. I thought we would have more than enough, but I struggled to cover the bottom of the pie dish. This could also be because I didn't use enough butter. The moral of this story: use your measuring spoons kids! Unless you're measuring Irish Cream. Then just eyeball it. And be generous. Then pour yourself a glass for all of your hard work.
In conclusion, I honestly have not seen the final product yet. It has been chilling in the fridge overnight and I'm super pumped to go home and dig in tonight. If I can get my camera working, I will put up some pictures so that everyone will be inspired to make their own. Who knows, maybe I'll bring in the leftovers for the lucky ladies at Young Audiences to sample!
Who are we kidding? There won't be leftovers.

Tuesday, June 28, 2011
Monday, June 27, 2011
Quick Chocolate Milk Shake
 The little boy I babysit for has been hounding me for a chocolate milkshake lately. When I say, what do you want for lunch, he says: "A chocolate milkshake!". When I say, what do you want as a snack, he says: "A chocolate milkshake!". You get the idea. I don't think it's a good idea to give an already super energetic seven-year-old milkshakes every time he asks, but after I found this recipe, I may make an exception. It's summer right? That means babysitters and kids alike need something to cool them down or make them smile on those weird rainy, cool, Indianapolis days when they can't go to the pool!
 Serves: 2 Prep: 5 minutes Cook: 0 minutes
Ingredients
Ingredients
6 rounded tbsp vanilla ice cream
4 tbsp drinking chocolate (chocolate syrup)
1 1/4 cups milk
1 chocolate flake bar, coarsely crushed (optional)
ground cinnamon, to dust (optional)
1. Place the vanilla ice cream, drinking chocolate, and milk in a blender or food processor.
2. Process the mixture for 30 seconds, then pour into 2 tall serving glasses.
3. If you've decided to use it, sprinkle with the flake, add a light dusting of cinnamon, and serve with straws, if you like. Or garnish with strawberries or raspberries. Be creative!
Viola! Super Simple! Super delicious!! Makes the babysitter and seven-year-old happy!
Thursday, June 23, 2011
Irish Cream Cheesecake
 You don't have to be lucky or Irish to make this decadent treat for grownups. Perfect for St. Patrick's day, a fancy event where you want to show off, or just because you want your Irish Cream in something other than coffee. Don't worry; there's nothing wrong with eating half a cheesecake by yourself. Just don't drive afterwards....
Irish Cream Cheesecake
Serves 12 Prep: 45 minutes plus 3 hrs Chilling Cook: 5 mins
Ingredients
Oil, for brushing
6 oz/ 175 g chocolate chip cookies
2 oz/55 g butter
2 oz/55 g butter
Filling
8 oz/225 g semisweet chocolate
8 oz/225 g semisweet chocolate
8 oz/225 g milk chocolate
3/4 cup golden superfine sugar
1 1/2 cups cream cheese
1 3/4 cups heavy cream, whipped
3 tbsp Irish cream liqueur
To Serve
Creme Fraiche or sour cream
Fresh Fruit
1. Line the bottom of an 8 inch/20 cm springform cake pain with foil and brush the sides with oil. Place the cookies in a plastic bag and crush with a rolling pin. Place the butter ina pan and heat gently until just melted, then stir in the crushed cookies. Press the mixture into the bottom of the pan and let chill in the refrigerator for 1 hour.
2. To make the tilling, melt the semisweet and milk chocolate together, stir to combine and let cool. Place the sugar and cream cheese in a large bowl and beat together until smooth, then fold in the whipped cream. Fold the mixture gently into the melted chocolate, then stir in the Irish cream liqueur.
3. Spoon the filling over the chilled biscuit base and smooth the surface. Cover and let chill in the refrigerator for 2 hours, or until quite firm. Transfer to a serving place and cut into small slices. Serve with a spoonful of creme fraiche or sour cream and fresh fruit.
Cook's Tip: Look out for minature bottles of Irish cream liqueur, as they are a handy size for cooking. If you cannot find Irish cream liqueur, try using brandy.
Simple, tasty, and no hangover!
Barbecued Chocolate Bananas!
Your beloved summer intern is pretty pumped about this recipe! To be honest, I haven't tried it yet. I just discovered it in Cassandra's Chocolate cook book, but jimney-crickets does it look fun. Barbecue? Chocolate? Bananas? Heck yes! I will try it this weekend and give everyone an update next week!
Barbecued Chocolate Bananas
Serves: 4 Prep: 5 minutes Cook time: 10 minutes
Ingredients
4 bananas
1 3/4 oz or 50 grams of chocolate chips
1 3/4 oz or 50 grams of miniature marshmallows
whipped cream, to serve
1. Using a sharp knife, slit the banana skins and almost through the bananas. Push chocolate chips and marshmallows into the slits, then wrap tightly in foil.
2. Place the banana and chocolate pockets on a grill rack and cook over hot coals on a lit barbecue for 10 minutes, turning after 5 minutes.
3. Open up the pockets carefully (they will be hot!) and serve the bananas with whipped cream.
Variation: For a fruitier flavor, add a selection of other fruits to each pocket, such as whole strawberries and raspberries, or peach and mango slices.
Tip: If you do not wish to use a barbecue, the banana pockets can be baked in a preheated oven at 425 degrees Fahrenheit for 15-20 minutes.
I'm going to do some variations of my own. I'm thinking raspberries on the inside and served with ice cream. Hmm. Anyone else have some ideas? I think the possibilites are endless!
Be nice to your chocolate; it's been through a lot!
 So, we've already looked into the long gooey history of where chocolate came from, but now we need to investigate the how? What magical transformation happens to take chocolate from a shriveled old pod in the jungle to the decadent treat we all know and love? Our very own arts programming sales manager, Cassandra, investigates.
By this point, we all pretty much know that chocolate is made from cacao. The largest growers of the cacao tree are Nigeria, Ghana, the Ivory Coast, and Brazil. Cacao beans are grown inside a pod, and take 5-6 months to develop. When they ripen, they turn from a greenish yellow to an orange or red. They are harvested twice a year. The pods are cut from the trees and placed on banana leaves in wooden boxes. They are left to ferment, and depending on the variety, this can take anywhere from 2-7 days. During this period, the beans darken, wrinkle, and loose their bitter taste. Afterwards the beans are sun dried for several days, then packed in burlap sacks and shipped to factories. The beans are then sorted and cleaned. The next stage is to roast the beans in large rotating drums at about 250-350 degrees Fahrenheit for 30 minutes to 2 hours, depending on the type. At this point the outer shell is removed in a process called winnowing and the inner nib is crushed into a fine paste called chocolate liquor (sorry, no alcohol here). From here, the chocolate liquor is pressed, separating out most of the cocoa butter (the fatty part of the chocolate). The solids that are left are referred to as cocoa solids or cocoa powder. The cocoa powdered can be left natural or it can be dutched, a process that involves treating the powd er with an alkali which causes it to react while baking differently than a natural powder would. At this point, there are countless ways of combining, shaping, molding, solidifying, kneading, conching, and refining the cocoa liquor and cocoa butter to get the desired effect. Chocolate comes in many shapes, sizes, flavors and forms and like anything good, it takes a lot of work to get it just right. Although this is a very brief summary of a long, complex process, I hopes it makes you stop and appreciate that chocolate bar you're eating a little bit more. It's had quite a journey!
 er with an alkali which causes it to react while baking differently than a natural powder would. At this point, there are countless ways of combining, shaping, molding, solidifying, kneading, conching, and refining the cocoa liquor and cocoa butter to get the desired effect. Chocolate comes in many shapes, sizes, flavors and forms and like anything good, it takes a lot of work to get it just right. Although this is a very brief summary of a long, complex process, I hopes it makes you stop and appreciate that chocolate bar you're eating a little bit more. It's had quite a journey!
 -Cassandra
Here's a couple of fun youtube videos if you want some more information!
Wednesday, June 22, 2011
Since we're on the topic of weird chocolate....
Since we're all about open minds here at Young Audiences, here's a story about some crunchy, munchy, mouth-watering chocolate covered bugs from our very own scheduling director, Angela's, hometown of Decatur, Illinois.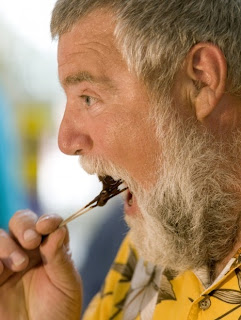

Decatur, IL--as well as much of central and southern Illinois--has been dealing with the 13 year cicada this summer. At my parents' house this means sitting out on the deck is out of the question for a few weeks, because the noise is incredible in a wooded neighborhood.
One local business has decided to make a fund raiser out of the creepy critters. This has got to be the worst example of the old adage "when life gives you lemons, make lemonade" that I have ever heard. The staff at an assisted living facility agreed to eat a chocolate covered cicada for every $10 donated to the Central Illinois Chapter of the Alzheimer's Association. The staff dietitian collected bugs from her own yard and made the "treats" herself at home. They raised $2000 dollars. That's right; they ate a collective 200 bugs.
-Angela
Hmm...perhaps a new fundraising idea for Young Audiences?
That's also the greatest picture of a man eating a chocolate covered cicada ever.
Thursday, June 16, 2011
If you love chocolate, you have to check these out!
 We've found some awesome, tasty, and sometimes bizarre chocolate websites for you! If you think yourself a true chocolate fan, you've got to look through these!
-Customize your own chocolate bar with Chocomize! And for a pretty good price too! Start with a nicely sized piece of chocoloate and then mix in up to five ingredients! And we're not just talking sprinkles and peanuts; you can add everything from pretzels and raspberries to lavender and 23-karat edible gold! I'm going to be honest: I may have spent about a half hour simply creating as many combinations as possible. Great for gifts or any day when you're feeling creative.
-Seriously, who doesn't want chocolate in the shape of a gun? Cure your sweet tooth and your love of firearms at chocolateammo.com . The perfect gift for the hunter and the chocoholic in your life!
-Bacon and chocolate finally together! It's about time! The people at Vosges Haut Chocolat are geniuses.
-Looking for a bunch of somewhat weird chocolate facts? Chocolateworld.com has got you covered. Everything from chocolate sushi to what it's like to be trapped in a giant vat of chocolate (maybe not as pleasant as you think).

-I bet all you chocolate lovers out there have been craving some chocolate covered bugs! Mmm. Crunchy. You can either make them at home (instead of getting out the bug-killers, round up those little critters and dip them in some melted chocolate for a tasty treat). Or you can buy them here. I'm sorry to say that we will not be having these at our Chocolate Fest, but I'm sure we can find something even tastier to make you feel better!
Those are only a few of the wacky chocolate sites out there. We're sure that the great world wide web is simply bursting with weird and delightful chocolate facts and products. We highly recommend going and searching for yourself and then getting back to us. Now, if you'll excuse us; there's a great big platter full of chocolate bug cookies waiting for us.
Joli's fool-proof Chocolate Cranberry Torte
 I love to bake. Even more so, I love to eat. So, it should be no surprise that my favorite and most used iPhone app is from Epicurious.com. It is a great resource, not only for fancy-pants recipes like my favorite pumpkin risotto, but also the basics like homemade pie crusts or whipped cream. The best part of the site is the ratings and reviews left by other users. I always read them before dciding to use the recipe and invariably tweak it based on other users' suggestions or my own intuition.
I first discovered the recipe below when I was planning an important holiday dinner. My parents were traveling from twelve hours away. I invited my in-laws to join us and began planning an elaborate four course meal sure to impress them all. Most of my recipes came from Epicurious. Just in case you are wondering, the menu included:
-Appetizer: PF Chang's Lettuce Wraps (which I actually serve without the lettuce in little wonton cups).
-First course: Marinated Shrimp with Champagne Buerre Blanc.
-Second course: Wedge salads with cherry tomatoes and blue cheese crumbles.
-Main course: Standing Rib Roast with Roesemary-Thyme Crust, steamed green beans, and roasted garlic mashed potatoes.
At this point in the meal, everyone was pretty sated. But the piece de resistance was dessert--a decadent rich chocolate creation which is surprisingly fool-proof. I have made it many times since and it is always a huge hit. In addition to the sauce, I usually serve it with homemade whipped cream, both of which balance out the richness of the torete quite well. According to my husband, the torte makes an excellent meal any time of the day, including breakfast!
Chocolate Cranberry Torte Recipe from Epicurious.com
Sauce
1 cup fresh or frozen cranberries
3/4 cup water
1/3 cup sugar
2 tablespoons Chambord (black raspberry liqueur)
Torte
1 cup dried sweetened cranberries
1/3 cup Chambord
1 cup (2 sticks) unsalted butter, cut into pieces
12 ounces bittersweet (not unsweetened) or semisweet chocolate chopped (i use dark chocolate)
1 1/2 cups sugar
6 large eggs, room temperature
2/3 cup all purpose flour
1/2 teaspoon salt
Glaze
1 cup whipping cream
10 ounces bittersweet (not unsweetened) or semisweet chocolate, chopped (again, I use dark chocolate)
1/4 cup Chambord
Fresh mint leaves
Preparation
For SauceBring first 3 ingredie nts to boil in saucepan over high heat, stirring until sugar dissolves. Reduce heat to medium; cook until cranberries burst, about 5 minutes. Transfer to processor; puree. Strain puree into bowl; discard seeds. Mix in Chambord. Cover; chill at least 2 hours or overnight (sauce will thicken).
nts to boil in saucepan over high heat, stirring until sugar dissolves. Reduce heat to medium; cook until cranberries burst, about 5 minutes. Transfer to processor; puree. Strain puree into bowl; discard seeds. Mix in Chambord. Cover; chill at least 2 hours or overnight (sauce will thicken).For torte:
Position rack in center of oven and preheat to 350 degrees F. Butter and flour 9-inch-diameter springform pan. Line bottom with parchment paper. Stir 3/4 cup cranberries and Chambord in small saucepan over medium heat until liqueur simmers, about 1 minute. Cool to room temperature. Drain cranberries; reserve liqueur and cranberries separately.
Melt butter in heavy large saucepan over medium heat, stirring until beginning to bubble at edges. From from heat. Add chocolate; let stand 1 minute. Whisk until chocolate is melted and smooth. Whisk in sugar, then eggs 1 at a time (batter will look grainy). Whisk in reserved liqueur. Add flour and salt; whisk gently until blended. Stir in reserved cranberries; transfer to prepared pan. Bake torte until top is puffed and cracked and tester inserted into center comes out with moist (not wet) batter attached, about 1 hour. Cool completely in pan on rack. (Can be made 1 day ahead. Cover; store at room temperature.)
For glaze:
Bring cream to simmer in medium saucepan. Remove from heat. Add chocolate; whisk until melted and smooth. Whisk in Chambord. Let stand until glaze is thick but still pourable, whisking occasionally about 2 hours.
Line rimmed baking sheet with foil; place cake rack in center. Cut around torte to loose; remove pan sides. Place 8-inch-diameter cardboard round or 8-inch tart pan bottom on top of torte. Holding cardboard springform pan bottom, turn torte over and place on rack. Remove pan bottom; peel off paper. Pour 1 1/2 cups glaze over torte. Using icing spatula, smooth glaze over top and sides (re-apply any glace from foil if necessary). Freeze torte until glaze is set, about 10 minutes. Pour remaining 1 cup glaze over torte and smooth evenly. Sprinkle remaining 1/4 cup dried cranberries around top edge. Freeze until glaze is firm, about 15 minutes. (Can be made 1 day ahead. Transfer to platter. Cover with cake dome and chill. Let stand at room temperature 1 hours before serving.)
Arrange fresh mint leaves between cranberries at top edge of torte. Cut into wedges and serve with sauce.
-Joli
Director of Development
Wednesday, June 15, 2011
Chocolate for breakfast? Oh yes!
Are you one of those people who thinks you have to sneak last-night's  desserts to eat chocolate for breakfast? Did you rejoice when the cereal "Cookie Crisp" came on the market? Well, I have a recipe for you. With this simple Biscuits and Chocolate Gravy recipe, you can have chocolate syrup all over your breakfast and be proud of it!
desserts to eat chocolate for breakfast? Did you rejoice when the cereal "Cookie Crisp" came on the market? Well, I have a recipe for you. With this simple Biscuits and Chocolate Gravy recipe, you can have chocolate syrup all over your breakfast and be proud of it!My mother-in-law is known far and wide for spreading the chocolatey goodness of this recipe to all those who set foot in her home, and as a Family and Consumer Sciences teacher, she knows how to make a recipe user-friendly. With high school kids, you can imagine all of the interesting recipe interpretations that she has seen in her days. So I am pleased to submit for mass consumption, Debbie Varga's famous, outstanding, Chocolate Biscuits and Gravy Recipe.
Basic Idea: Bake a roll of buttermilk biscuits (Pillsbury works) according to the package and drizzle chocolate gravy (recipe below) over top. Enjoy!
Chocolate Gravy
3/4 cup sugar
1/4 cup flour
1/4 cup cocoa
1/4 cup water
3/4 cup milk
1 tsp. vanilla
1 Tbsp. margarine
Thoroughly combine dry ingredients in saucepan. Boil water in microwave (usually takes around 30-40 seconds). Add to dry mixture, stir to make a paste. Add milk (may be warmed in the microwave for one minute). Cook over medium heat, stirring constantly . When mixture thickens, stir in vanilla and margarine. If too thick, add more milk, a little at a time. Serve over biscuits. Makes enough for one tube of biscuits. Can be doubled or tripled.
 . When mixture thickens, stir in vanilla and margarine. If too thick, add more milk, a little at a time. Serve over biscuits. Makes enough for one tube of biscuits. Can be doubled or tripled.
Now you know why I spend every holiday with a belly full of Chocolate Gravy.
Cheers,
Stephanie
Director of Artist programs.
Wednesday, June 8, 2011
Holy Cow, Cupcakes!
Can some of the best cupcakes around come from a tiny shop connected to a Circle K gas station? Your intrepid YA summer intern decided to find out. With my faithful sidekick Jackie by my side (not affiliated with Young Audiences, but a strong supporter of the arts and cupcakes), we journeyed into the unknown wilderness of Carmel, armed only with a crumpled set of directions and an appetite for delicious frosted baked goods.
Holy Cow, Cupcakes! was started by Karen Sutton around two years ago. Taught by her mother and grandmother--two women who knew their way around a kitchen enough to have earned home economic degrees--Karen has been baking her entire life. After creating and experimenting with cupcakes for her firefighter husband's shifts at the fire station, she was inspired to try her hand at selling her baked goodies with a booth in the Carmel Farmers market.
After bravely braving rush hour traffic, almost rear-ending one or two SUVs, and only having to turn around once (although possessing other skills your intrepid intern is not a good navigator), we finally arrive at the famous Circle K gas station and the even more famous Holy Cow, Cupcakes! bakery. Wafting from under a red awning, the smell of baked goods cuts through the smell of gas like a breath of fresh air.
The Carmel Farmers Market was a roaring success for Karen and her cupcakes, or cuppies as she affectionately refers to them. Within one hour of the three hour market, Karen was almost completely sold out. After participating in several more Farmers Markets and watching her treats practically fly off the table, Karen realized that her cuppies were definitely something special.
The inside of the shop is one room divided into two sections: the store and the baking area. We are greeted by two friendly staff members who are in the middle of helping a woman fill a large order. As we wait for our turn at  the cupcake counter two things are immediately noticeable: the green wall covered with scrawling compliments written by satisfied customers and the most important thing of all....the display case filled with that day's selection mouth-watering goodies. The second part of the shop is the actual baking area. Here we can see the large mixing bowl, boxes and bags of ingredients, colorful jars of sprinkles, and the ovens for cooking. Although all is calm for the moment in this area, I'm sure hours ago it was a flurry of baking frenzy. I personally think it's neato to be able to actually see where my cupcake comes from. They've got nothing to hide and want their customers to be part of the action. I haven't even tasted one of their treats yet, but I've already got a good feeling about this place.
 the cupcake counter two things are immediately noticeable: the green wall covered with scrawling compliments written by satisfied customers and the most important thing of all....the display case filled with that day's selection mouth-watering goodies. The second part of the shop is the actual baking area. Here we can see the large mixing bowl, boxes and bags of ingredients, colorful jars of sprinkles, and the ovens for cooking. Although all is calm for the moment in this area, I'm sure hours ago it was a flurry of baking frenzy. I personally think it's neato to be able to actually see where my cupcake comes from. They've got nothing to hide and want their customers to be part of the action. I haven't even tasted one of their treats yet, but I've already got a good feeling about this place.
In May of 2009, Karen opened Holy Cow, Cupcakes! on Rangeline Road. Just in that short amount of time her cupcakes have made appearances at numerous weddings, parties, and even the Indianapolis Zoo's Zoobilation! Her walls are covered with delighted cupcake lovers' thanks and compliments and the cupcakery has even been featured on WTHR Sunrise with Nichole Misencik. Business has grown so much over the past two years that it's time to leave the nest of the Circle K Gas station and seek fair fortunes elsewhere, or just a few blocks down the road at the new Carmel City Center Development (61 West City Center Drive will be the new address). Their new shop will feature not only their vast array of cupcake flavors, but will also begin serving coffee, espresso, and other baked treats.
When I talked to Karen, the owner of the shop, she had confessed that although they would be featuring their quadruple chocolate cupcake at the Chocolate Fest (an impressive chocolate concoction that is now staring me in the face), her all time favorite cupcake is the chocolate chip cookie dough cupcake, or the Alex. Now, this was a tough decision. I should sample the quadruple chocolate cupcake so I can report back to the staff at YA, as well as my beloved blog readers, but that chocolate chip cookie dough cupcake looks like one of the most delicious things I'd ever seen in my life. Then I spot the raspberry chocolate ganache cupcake. Now I'm torn. I love raspberry and chocolate, but anything with cookie dough, especially a cupcake with cookie dough in the middle of it and topped with fudge frosting, simply amazes me. Jackie, my trusty sidekick, makes her decision very quickly: red velvet cake with cream cheese frosting, one of the shop's best sellers. The quadruple chocolate cupcake looks amazing, but I figure I'll have plenty of time to sample it at Chocolate Fest. Now I have to decide between the other two. I don't think I can make up my mind...so I don't*. I buy both the chocolate chip cookie dough and raspberry chocolate ganache cupcake. The cupcakes are just the right size and a very nice price (only 2.25 for one). So, with our box o'cuppies, Jackie and I pile back into the car, and drive back to Indy, victorious with our spoils of adventure.
Sitting in a Starbucks, with iced tea in hand, my trusty side kick and I chow down. Holy cow is right! To be completely honest, I'm not a big frosting fan. But this fudge frosting was amazing! I may or may not have licked the cupcake wrapper clean. In public. Good thing Jackie's such a good friend and doesn't get embarressed easily! The actual cake part of the cupcake is just as good as its topping: moist and not-overly sweet. Once I actually get to the cookie dough part, I feel as though I've died and gone to heaven! Jackie gives her cupcake an A+, saying that the cream cheese frosting was some of the best she has ever had. So, all in all, our mission was a success. Bravely going where no intern and her friend have gone before, we set out to find out if a delicious cupcake could come from a gas station. Using our wits, guts, and sci entific experimentation, we discovered the truth: oh boy! Yes they can!
 entific experimentation, we discovered the truth: oh boy! Yes they can!
 It's been an exciting two years for Karen and Holy Cow, Cupcakes! We absolutely cannot wait to have them at our Chocolate Fest. If you yourself can't wait until September to sample some amazing cupcakes, why don't you mooo-sey down to Carmel and try them for yourself! Check out the website for flavors, business information, and pictures that will make your mouth water!
*To be completely honest, I bought two cupcakes with every intention of giving one of them to my boyfriend. He loves chocolate chip cookies and I originally planned to give him the cookie dough cupcake and keep the raspberry ganache for myself. But that cookie dough cupcake proved too tempting for a mere mortal. We'll be going back to Holy Cow, Cupcakes! soon as I now owe him another cupcake.
Kim's Chocolate Memory
 In the house where I grew up, chocolate was a precious commodity. The only chocolate we usually had was a bag of chocolate chips. These were very off limits to my sister and I. Mom needed them to bake with and we were absolutely not allowed to touch them. Well, does anyone really ever follow ALL of the rules when she's a kid? One day, when Mom wasn't looking, we cut a tiny hole in the bag the perfect size for just one little chocolate chip to slip through. This way we could eat the chocolate chips one at a time without our mother ever noticing.
When I was about eight, I got tired of sneaking one chip at a time. I wanted to share those tasty little treats with everyone! So, without a thought to the consequences, I took a whole bunch of chocolate chips from the coveted bag. I went to the bathroom and got out our Dixie cup dispenser. Placing one little chip in between each cup, I felt pleased with myself: What a happy surprise I was giving everyone when they thought they were only going to get a drink! The dispenser was in the kids' bathroom, so it took my mother a while to discover the missing chocolate chips. Of course she was going to discover it eventually, and when she did, oh wow, was she mad! Naturally, I blamed it on my innocent and clueless sister and she was the one who got in trouble. But I learned my lesson; I never touched those chocolate chips again!
-Kim
Director of School Partnerships
Tuesday, June 7, 2011
A delightful chocolate joke
A man found a bottle on the beach. He opened it and out popped a genie, who gave the man three wishes. The man wished for a million dollars, and poof! There was a million dollars! Then he wished for a convertable, and poof! There was a convertable! Then he wished to be irresitable to women, and poof! He turned into a box of chocolates!
Haha! Feel free to take credit for that one around the water cooler!
Haha! Feel free to take credit for that one around the water cooler!
Angela's Hot Fudge Pudding Cake
 We're all about sharing what we love here at Young Audiences and that's why we're posting some of our all time favorite recipes for you, our beloved to reader, to enjoy! Feel free to leave us feedback or post some of your own favorite scrum-dil-e-umptious chocolate recipes.
Hot Fudge Pudding Cake
1 1/2 cup of cold coffee (or same amount of water mixed with 2 tsp. instant coffee)
2/3 dutch processed cocoa, divided into 1/3 cups
1/3 cup packed brown sugar
1/3 cup granulated sugar, 2/3 cup granulated sugar for later use
6 Tbsp unsalted butter
2 oz bittersweet or semi sweet chocolate, chopped
3/4 cup all-purpose flour
2 tsp baking powder
1 Tbsp vanilla
1/3 cup milk
1/4 tsp salt
1 large egg yolk
Preheat oven to 325 degrees Fahrenheit and lightly spray an 8-inch glass or ceramic baking dish.
Stir together 1/3 cup of the cocoa, brown sugar, and 1/3 cup of the granulated sugar. Set aside. Melt the butter, the remaining cocoa, and the chopped chocolate in a small bowl (or use a double boiler if you have one) over a saucepan of barely simmering water; whisk until smooth and set aside to cool. Whisk flower and baking powder; set aside. Whisk the remaining 2/3 cup of granulated sugar, vanilla, milk and salt in a bowl until combined, then whisk in the egg yolk. To that bowl, add chocolate mixture and whisk to combine. Add the flour mixture and whisk until evenly moistened.
Pour the batter in the prepared baking dish and spread evenly to the sides and corners. Sprinkle the cocoa/sugar mixture evenly over the batter; cover the entire surface. Pour coffee gently on top. DO NOT MIX.
Bake until the cake is puffed and bubbling and just beginning to pull away from the sides of the dish, about 45 minutes. Cool, in the dish for about 25 minutes before serving.
Individual Cakes version:
In 8-oz ramekins, pour about 1/4 cup of batter, sprinkle about 2 Tbsp of the cocoa/sugar mix; pour 3 Tbsp of the coffee over the top. Bake about 20 minutes and cool for about 15.
Angela's Thoughts:
Don't do what I did the first time: mix the vanilla, milk, and egg concoction in too small of a bowl. It can get messy. A medium bowl will do, but don't worry about erring on the side of caution and using a larger bowl than you think you need.
I definitely recommend the cold coffee over the water and instant powder version--the instant just doest have the same richness of flavor. If you're a coffee drinker, you probably have better quality coffee in your maker from the day before than the ancient jar of instant in your pantry.
I'll be honest, there are two moderately intimidating things about this recipe: inserting a half mixed mess into the oven and pulling out what looks like a half-baked cake. Despite this, resist the urge to mix the coffee and cocoa into the batter and/or resist the temptation to bake the cake for just a little bit longer. The messy parts are the parts that give you the ooey gooey goodness of hot fudge in the middle of your cake. This is best served still a bit warm with ice cream on the side or a glass of milk. I haven't tried the individual cakes version, so I can't tell you if you get the same loveliness in the middle. Someone should try it and let me know.
Enjoy!
-Angela
Scheduling Director
Wednesday, June 1, 2011
A quick little post about chocolate and your pets
 We know you love chocolate. We know you love your cat or dog. We know that you may love sharing a scrumptious piece of chocolate at the end of a hard day with Fido or Mittens. It's wonderful that you love your pets so much that you can't resist giving them a special treat, but chocolate is poisonous to your animals. There's no ifs, ands, or buts, about it.
We've heard the excuses before: "He's a big dog; it won't bother him!" or "I just give her a little every now and then". The fact remains that your animal, regardless of how big or small, cannot digest chocolate. Chocolate possesses theobromine, a naturally occuring chemical in cacao that is similar to caffeine. While it's a great pick-me-up for humans, dogs and cats lack the specific enzyme needed to properly metabolize it. Overdoses of theobromine can lead to seizures, convulsions, and even death.
Here's a quick overview of how much chocolate can cause a problem:
4 t0 10 ounces of milk chocolate or 1/2-1 ounce of baking chocolate for small dogs such as toy poodles and chihuahua
1 to 1 1/2 pounds of milk chocolate or 2 to 3 ounces of baking chocolate for medium sized dogs, like cocker spaniels and dachsunds.
2 to 4 1/2 pounds of milk chocolate or 4 to 8 ounces of baking chocolate for large dogs, such labs and collies.
You may be thinking, "Well, that's a lot of chocolate for a dog to eat! I only give my dog small pieces". Consider this: if there was something that was only slightly poisonous to your child, would you still feed small pieces to him or her? Probably not.

What do you do if your beloved Flopsy or Mopsy scarfs down a cookie or two? Depending on how large your pet is, chances are you simply need to keep a watchful eye on him/her, looking for any unusual signs. If, however, Fido eats an entire box of baking chocolate (believe us, it can happen) call your vet or an emergency vet clinic immediatley.
So, take good care of your pets! They are counting on you to give them only the best. If you want to share something special with your pet, try one of the recipes below. Save the chocolate for yourself!
Bone appetit! (Haha get it?)
Yummy treats for your dog!
Homemade treats for your cat!
More Chocolate Thoughts from Chef Steve!
Hungry for more chocolate history? We thought so. Chef Steven Keneipp shares more about chocolate's decadent past! If you've been keeping up with our blog so far, this will be a nice, quick review, but you will also find some brand new information that we are sure you'll find quite satisfying. If this is your first time reading about this decadent history, you're in for a treat! Either way, you'll be an expert by the time you're done reading.
 A single bite into a piece of chocolate can magically conjure up thoughts of history, civilization, exotic origins, and most importantly, deliciousness.
Amazingly, it was only in the early part of the 19th century that the English first produced a rather coarse eating chocolate. And it was not until the mid 1850's that better quality chocolate was created by Cadbury in England. The Swiss added milk to it in the 1870's a nd also developed manufacturing techniques that produced "fondant" that melted quickly in the mouth. Milton Hershey, an American, created his first candy bar in 1894. Chocolate's popularity increased and became more affordable throughout the world in the beginning of the 20th century. It accompanied soldiers in wars and traveled to school in children's lunchboxes and remained as one of the most popular ways to express affection. As we begin the 21st millennium, chocolate continues to be refined, rethought, and rediscovered.
 A single bite into a piece of chocolate can magically conjure up thoughts of history, civilization, exotic origins, and most importantly, deliciousness.
Cacao is the seed from which chocolate is produced and it was the cultures of Mexico, Central America, and other areas in Mesoamerica that discovered and utilized it as a beverage since its use had begun almost three thousand years ago. The Aztecs made a drink called "chocolatl" that Montezuma served to Cortez in 1519. There was no sugar in this New World elixir and it was based with water and ground cacao beans that was then flavored with spicy peppers, allspice, vanilla and ground, dried corn. The Spanish did not particularly like it and found it bitter and rather unpleasant. When it was taken back to Spain, sugar was added to the beverage as well as every imaginable ingredient that included cloves, rose oil, cinnamon, and even ambergris. And just as the drink had been reserved for the Aztec royals, so too was it for the aristocracy of Spain for almost one hundred years before it finally traveled to other elite sipping circles in Europe.
Amazingly, it was only in the early part of the 19th century that the English first produced a rather coarse eating chocolate. And it was not until the mid 1850's that better quality chocolate was created by Cadbury in England. The Swiss added milk to it in the 1870's a
 nd also developed manufacturing techniques that produced "fondant" that melted quickly in the mouth. Milton Hershey, an American, created his first candy bar in 1894. Chocolate's popularity increased and became more affordable throughout the world in the beginning of the 20th century. It accompanied soldiers in wars and traveled to school in children's lunchboxes and remained as one of the most popular ways to express affection. As we begin the 21st millennium, chocolate continues to be refined, rethought, and rediscovered.
So the next time you eat a piece of chocolate, allow the warmth of your mouth to slowly melt it while savoring its smoothness, its sweetness and its flavor. Let your mind think of its long journeyed history and evolution....it can be quite a delicious adventure!
-Chef Steve
Chocolate thoughts from Chef Steve Keneipp
For your reading pleasure, Young Audience is delighted to present Steven Douglas Keneipp MS, CCP, Chef/proprietor The Classic Kitchen 28 years, Community Nutritionist St. Vincent's Hospital 20 years, Freelance travel/food writer, Young Audiences Indianapolis board Member and Chocolate Fest Chairman 21 years, Instructor of Culinary Arts and Nutrition at The Art Institute of Indianapolis. Steve was kind enough to share some of his thoughts and knowledge with our blog, as well as one of his tasty recipes.
Steve's Double Chocolate Brownies
Yield: 16
6 Tablespoons unsalted butter
1/2 cup Dutch processed cocoa such as Droste
1 cup granulated sugar2 large eggs, room temperature
1-teaspoon pure vanilla extract
1/2 c. unbleached white flour
1/8-teaspoon salt
1 cup chocolate chips, good quality such as Ghiradelli dark
1/2 cup English Walnuts, coarsely chopped (optional)
Preheat oven to 325 degrees Fahrenheit and spray an 8"x 8" pan with a vegetable non-stick. Disposable foil pans work very well and can easily be wrapped in plastic and given as a gift.
In a glass two quart mixing bowl melt butter in the microwave. Remove from the microwave and whisk in the cocoa. Using a wooden spoon or spatula, stir in the sugar, eggs, and vanilla until well combined. Stir in flour, salt, chocolate chips, and nuts. Spread mixture into prepared pan and bake about 30 to 35 minutes or until slightly firm in the center and when the outside crust just begins to leave the sides of the pan. Cool on rack. Cut into sixteen pieces. Brownies could be dusted with a little powdered sugar or cocoa if desired.
Variations:
-Eliminate walnuts; spread out half the brownie mixture, pour over a 1/4 cup melted raspberry jam, top with remaining brownie mixture.
-Eliminate walnuts; add zest of one orange finely chopped, flavor with pure orange extract instead of vanilla then splash warm brownies with a little Grande Marnier (optional).
-Substitute pecans for walnuts, add 1/2 cup dried cherries or dried currants.
-Eliminate nuts; add 1/2 cup crushed peppermint hard candy, substitute peppermint extract for vanilla extract.
-Substitute pine nuts for walnuts. Substitute light olive oil for butter...do not use extra virgin olive oil as it would be too strong in flavor, then add the finely grated zest of one orange.
My recipe for brownies was developed as a request to speak at a conference of Indiana secondary consumer science teachers. I was given the freedom of choosing my own topic. The objective of my session was to teach the concept of making something from scratch that would prove better than anything store-bought. This idea would then be taught to secondary age students. I created my brownie as a vehicle for my message. Not only did it taste better than any packaged mix from the supermarket, but it also cost less and freed the maker from opening up some corporately created mix with poor quality ingredients. It also allowed for variations to teach how one could customize a recipe, thus giving it a new personalized identity.
I shared the recipe with Steve Pratt, a friend and at that time a food editor for the Chicago Tribune, when he and I had lunch at Neiman-Marcus. It was just before Christmas, so I had a gift basket for him that had some of my caramels, herbs, Red River pecans, and a pan of my brownies with the recipe. A few weeks later he called me to tell me to look at the next day's Trib. I was surprised the next night to see my recipe and story in the Chicago paper. The recipe went out on the wire and ended up in papers around the country. My friend Barbara Adachi later told me that it even appeared in the Tokyo paper, where she and her husband had a home. Susan Purdy, one of America's great writers of dessert, later asked if she could include it in her book, The Family Baker. It is still one of my favorite recipes from my repertoire and is also one of my simplest to prepare. I continue to create new variations. The one with the light olive oil is a recent version and it never fails to please and surprise guests when they learn the ingredients. Baking them in mini-muffin tins or in a nine inch round cake pan creates further possibilities.
-Chef Steve
Subscribe to:
Posts (Atom)